Wednesday, 15 February 2017

It's Your Birthday Genie Marci Card

Well I have been busy with job interviews, cleaning our house and organising a birthday party for someone special. 
I can't believe that 10 years ago, I went to the hospital in Garmisch-Partenkirchen for a "check up" after not feeling very well the whole day and was told that I was 10 cms dilated and 2 hours later I had a baby girl in my arms! :) 
Time has definitely flown and on Sunday we had an archery party with 7 of Aby's friends - huge thank yous to my mum Julie who did a lot of the prep work at the party place. 
I baked a couple of cakes which looked awesome and layered them together with black butter cream before placing an edible image that I created of a bulls eye with an arrow and "Happy 10th Birthday Abigayle". I also made stickers to place on the party bags and all over the table cloth.


Yesterday I mashed up the leftover birthday cake with the tops of the cake that I kept and made cake pops. Aby took them to school today to enjoy with her class mates. I meant to use the leftover party stickers to place on the sticks, but at 1 am this morning, my head was not screwed on properly! The cake pops were a hit with Aby's classmates and teachers! :)


So enough about the cake and party! I made a card for Aby's birthday using the sketch from CAS(E) this sketch:


I also wanted to use Genie Marci, a La-La Land Craft Club image that I have not used before. I coloured Genie Marci using inspiration from Sandie at The Paper Cove. I used the Copics pens as listed in this picture (hopefully you can all read my writing!):


I had to fussy cut the image and as you can see I have had a bit of an accident with other ink! I was a bit clumsy today!

For the rest of the card, I used washi tape to mark off my rectangle of paper on my card, stamped the sentiment "It's your birthday" from the January 2017 Club La-La Land kit using Vivid! Ultramarine ink. I also used the cupcake from the same kit and stamped it using Vivid! Purple ink and Vivid! Raspberry ink:


So then here is my completed card, after I have adhered Genie Marci using foam squares:


Hopefully you can see all the glittery bits I added to her hair and outfit!

Thanks for looking!


Friday, 20 January 2017

Spring Fever - Flowers, Sunshine, Romance - Winter Wonderland Challenge for the 20th of January 2017

Sorry we have been a little delayed in posting our next challenge at Winter Wonderland. Unfortunately our fearless leader Eileen has taken ill and so the lovely Helen is filling in for her while she gets back on her feet.
Marlene is our host for the latest challenge and she has chosen the theme Spring Fever. This means that you can make a card with flowers, sunshine and romance and it doesn't have to be Christmas themed!
We do not have a sponsor for this challenge, however, one lucky person will be chosen by Mr Random to receive a surprise prize from the lovely Kath.

So on to my card.....as it is school holidays here in Australia, I have been very busy keeping my two beautiful children entertained and not actually had much time to create a card, which is not too good as one of my goals this year is to create at least one card a week, so I am already behind! 
I found some previously coloured geraniums from Power Poppy in my completed box.
Here is a close up of them - not sure what Copics I have used! I will have to work it out and try and update this post.

The digital stamps were printed on X-Press It paper and then my Silhouette Cameo cut them out. 
I have decided to keep this card simple and followed the sketch from CAS(E) this Sketch #204. Unfortunately their challenge closes on a Thursday so I could not enter my card, but I'll mention them anyway as they have some great sketches if you are into clean and simple!

So here is the finished card:


I have added the sentiment "you make me smile" on the front with Cottage Ivy Memento Ink using my new MISTI that I received for Christmas from my husband! :)
I also stamped a quote from Mark Twain on the inside - "The best way to cheer yourself up is to try to cheer somebody else up" That is something that I want to do this year - work on adding more to the inside of the card!
Both of these sentiments are from Prairie Cheer from Power Poppy. This is a clear stamp set from August 2016.
Here is a photo of my MISTI stamping the quote:


I adhered the geraniums on the front using pop dots to give it a bit of dimension, then used double sided tape for the small geranium on the inside:


There is inspiration from both the Snowflakes and Icicles DT over on the Winter Wonderland blog, so please pop over to everyone's blog by clicking on their name. We always appreciate a comment or two! :) You can also find out what other challenges are out there, which could give you ideas to increase your stash of cards.

Enjoy the challenge and remember that you have until Thursday the 16th of February 5:00 pm GMT to leave your entry with the blue frog so that we can come and find your beautiful cards and blogs. You an also enter the challenge up to three times, so you could make a card a week, like me! :)

Thanks for looking!


Friday, 16 December 2016

For Someone Special/Happy New Year - Winter Wonderland Challenge for the 16th of December

For the next three weeks at Winter Wonderland we are hosted by Eileen. She has chosen the theme: For Someone Special,
or Happy New Year.

As this challenge runs through into January you can use any image that you want, that is it does not have to be a Christmas image or project. This will actually continue until the end of March and then we will go back to Christmas projects only. It is a good way to have a break from all the Christmas projects and increase your non-Christmas card stash!

For this challenge, we are sponsored by:

Sami at A Day For Daisies, who is giving a voucher for $12 to spend in their store


and Crafter's Companion, who are giving a 10 pound voucher to spend in their store.


So on to my card! Well actually it is a tag.....I have been so busy making chocolate fudge and chocolate truffles to give away for Christmas to teachers and friends, that this is a quick one!


I used an image from A Day for Daisies called Penguin Snowman.
I have printed him out on X-Press It Blending Card, then cut it into a tag shape using my Silhouette Cameo.
I have coloured the image using the following Copics pens:
  • snow - BV000, C0
  • scarf - G02, G05, G17
  • hat - R32, R35, R37
  • penguin feet and snowman nose - YR04
  • snowman buttons and eyes - black Wink of Stella
  • background (from the top) - B99, B69, V17, V04, RV55, RV02, Y02, YG06, YG67

I added Frosted Lace stickles to the snowflakes in the image, then I have stamped the sentiment "Let It Snow" from Let it Snow from The Greeting Farm in glue then sprinkled Diamond Glitter (hope that you can see the sparkle), then I attached a ribbon that I coloured with Copics pen B69.

The idea for the background is from the Kit and Clowder Northern Lights Workshop which was part of Create and Learn, but is available as part of a mini Technique Bundle. Alyce always has some great ideas! :)

I would like to enter this card into the following challenges:
Tag You're It #62 - I may enter some other tags into this challenge!
Merry Monday #226 - Winter Fun - the snowman and penguins are having fun!


There is inspiration from both the Snowflakes and Icicles DT over on the Winter Wonderland blog, so please pop over to everyone's blog by clicking on their name. We always appreciate a comment or two! :) You can also find out what other challenges are out there, which could give you some ideas for your card stash.

Enjoy the challenge and remember that you have three weeks to enter and you can enter up to 3 times - so why not make a card a week! :)

Thanks for looking!

Friday, 18 November 2016

Poinsettias or Snow is Falling - Winter Wonderland Challenge for the 18th of November

The next two weeks on Winter Wonderland, we are hosted by me! :)
I have chosen the themes: Poinsettias or Snow is Falling.
So this means that you create a Christmas Project with the beautiful Christmas flowers Poinsettias, or you create a project where we can see that snow is falling, or snow has fallen. Or you can try and include both themes!

For this challenge, we have the wonderful sponsor:
Crafty Sentiments Designs, who are offering the lucky winner a choice of 3 digi stamps from their website


Please remember that to be in with a chance of winning a prize that it is Christmas Projects only.

So on to my card.

I have been waiting for the right moment to use this beautiful poinsettias stamp from the Poinsettia Stamp Set by Power Poppy.
Here is a close up of the colouring:


I stamped the poinsettia on to X-Press It card using Tuxedo Black Memento Ink. I then coloured it with the following Copics Pens:
poinsettia - RV02, RV13, RV14, RV17, RV66, YG00, YG11, G21, pink Wink of Stella pen, yellow Wink of Stella pen
leaves of poinsettia - YG11, G21, G82, G94, G17, G99, green Wink of Stella pen
greenery - BG96, G29, green Wink of Stella pen
pomegranates - R83, R85, R89, pink Wink of Stella pen, yellow Wink of Stella pen
leaves of pomegranates - YG11, G82, G85, G99, green Wink of Stella pen
background - BV00, BV02

I have cut out the poinsettia with some of the background, so no real fussy cutting this week!

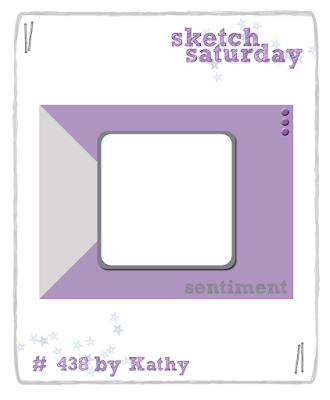
Then I have followed Sketch #438 from Sketch Saturday.

I have cut a piece of pink glitter cardstock from Core'dinations for the triangle and adhered it to a white card from Envelope Solutions. Then adhered the poinsettia on top. I have stamped the sentiment "Merry Christmas Wishes" from a new stamp set by Power Poppy - Simple Joys using Cottage Ivy Memento Ink in the bottom right corner. Then I have coloured some Rhinestones from KaiserCraft using my RV66 Copic pen and attached them to the card in the top right corner.

I suppose I had better show you the final card!
Here it is:


I hope that you can see the glittery sparkle on the colouring.

I would also like to enter this card into the following challenges:
Weekly Christmas Card Challenges - glitter


Power & Spark Challenge at Power Poppy - Think Pink


There is inspiration from the Snowflakes DT over on the Winter Wonderland blog, so please pop over to everyone's blog by clicking on their name. We always appreciate a comment or two! :)
You can also find out if they have combined their challenge with any others, which could give you some ideas for your Christmas Card stash!

Enjoy the challenge and remember that you now have two weeks to enter and you can enter up to 3 times - so why not make three cards! :)

Thanks for looking!

Monday, 31 October 2016

Power Poppy - Make It Move Challenge

There is a challenge over at Power Poppy which has pushed me to finally make a shaker card!
The challenge is "Make it move", so I have sort of followed a tutorial by Kathy Racoosin on Power Poppy and made a wreath as my housing for my shaker card. But instead of using circular dies, I have used the greenery from Glittering Glass Santa. I created a wreath in Photoshop Elements and then had my Silhouette Cameo print and cut from X-Press It paper.

I have then coloured it with the following Copics pens:
  • berries - R27, R59, clear Wink of Stella
  • leaves - G05, YG17, YG67, light green Wink of Stella, green Wink of Stella
  • background - B000, B02
I have then stamped the tree and ornaments from Bottlebrush Holiday using Black Tuxedo Memento ink on to X-Press It paper and fussy cut it out.
I have coloured this with the following Copics pens:
  • tree - G05, YG17, YG67, R27, R59, clear Wink of Stella
  • base of tree - E55, Y28
  • blue bauble - B000, B00, B02, clear Wink of Stella
  • pink bauble - RV00, RV63, RV66, blue Wink of Stella
  • purple bauble - BV11, BV13, BV17, clear Wink of Stella
  • banner - C0, C1, C2
I stamped "Be Merry" using bamboo leaves Memento Ink and I used a Tuxedo Black Memento marker around the edges.

I have then used a white square card from Envelope Solutions. I made the shaker pocket by using a Waterfall Photo Sleeve from We R Memory Keepers and the FUSE tool. I added sequins and little beads from my stash.
I adhered the filled and fused shaker pocket to the back of the wreath and then used dimensional tape to give it a bit of height before adhering to the centre of the card. I then adhered the tree and ornaments at the bottom.
Here is the finished card:

Let me know what you think?
I am also entering this card into the Rudolph Days Challenge and the 52 Christmas Card Throwdown challenge which is to pick a previous sketch. I picked the following sketch:

I am also entering this card into the Weekly Christmas Card Challenges, where the theme is "Anything Goes" and of course, the inspiration behind this card is the Power & Spark Make It Move challenge over at Power Poppy.

Thanks for looking!


Monday, 24 October 2016

Flower Challenge - Trio of Peonies

I have found a new challenge this week - The Flower Challenge, which is brand new this month. Their theme for their first challenge is "Anything Goes with Floral".


So I had a look in my already coloured box and found the trio of peonies from Power Poppy Stamps.
I totally adore the drawings of Marcella and the sentiments.

Unfortunately I can not for the life of me find where I have written down the Copics Pens I used to colour these beautiful peonies, but after colouring the sentiment with V01 and V04, I think it is the same, plus one other from the V range. I think I have used Y11 and Y15 in the centre. Then the leaves are probably YG67, YG63 and maybe YG06??
(If I find the correct colours I will update this post, but more likely I will colour this stamp again and then write down the correct colours!)

I have digitally stamped on to X-Press It card and then used my Silhouette Cameo to cut out all the images (not a fussy cutting fan!)

Here is a close up of the colouring:


I have adhered it to a white square card from Envelope Solutions, along with the coloured sentiment:


I also coloured a single peony and adhered it to the inside of the card:

This card could also be used as a Get Well card, so I will also enter this card into the Cupcake Inspirations Challenge.


If I have time I may do another card for this challenge.

Thanks for looking!


Friday, 21 October 2016

Frosty or Well Wrapped Up - Winter Wonderland Challenge for the 21st of October

This week at Winter Wonderland, we are hosted by Marie, who has decided on the themes:
Frosty - which means cold colours such as blue, silver and white, or an alternative is snowmen
or
Well Wrapped Up

We have two sponsors this week:
Marianne design, who are offering a special prize to the winner

and we are also sponsored by
Bugaboo Stamps, who have a prize of 7 images for the winner.

Please remember that to be in with a chance of winning a prize that it is Christmas projects only.

So on to my card!


I have dabbed Summer Sky Memento ink through my "Winter Snowflake Lace" designer stencil from Memory Box on to my white card from Envelope Solutions.
I have then digitally printed the snowman and sentiment from Let's Chill by Marcella at Power Poppy Stamps on to X-Press It card. I used my Silhouette Cameo to cut them out (I do not like fussy cutting!)
I have coloured the snowman with the following Copics markers:
  • scarf and hat: BG13, BG10, BG000, BG0000
  • buttons: BG13, BG000
  • carrot nose: YR07, YR04
  • arms: E37, E35,  R35
  • bird: R35, R32
  • snowman: C1, C0, RV00 (cheeks)
  • snow: C1, C0, BV0000
  • background: BV0000, BV000
  • eyes and mouth: black Wink of Stella
I have coloured the sentiment with BG10 and outlined in BG13.
I have added a bit of sparkle to the snowman and snow using my Wink of Stella brush pen.
Here is a close up of the snowman:

I am entering this card in the Sparkles Christmas Challenge - Show me a Snowman

There is inspiration from the Snowflakes DT over on the Winter Wonderland blog, so please pop over to everyone's blog by clicking on their name. We always appreciate a comment or two! :)
You can also find out what other challenges are out there, which could give you some ideas for your Christmas Card stash.

Enjoy the challenge and remember you now have two weeks to enter and you can enter up to 3 times - so why not make three cards! :)

Thanks for looking!